
Rick McBee's Writings
Explore the magic of new ideas and books to read as well as see what books I have written, my favorite photos, my opinions on may subjects, including Science, Africa, the Caribbean, the Civil War, my Book Reviews, and Much More!
Repairing an Old Violin – Keeping Sane in the times of COVID-19
Who would have thought that $10.00 spent on a falling apart old violin could keep me occupied for so much time and give me so much enjoyment?
Wow! Found it in August of this year, sitting all cracked and scratched with the front and back falling off and a section of one side broken, in the photographic store of a friend here in Hood River. As a former violin player, it piqued my interest, so for a tenner I got to take it home.
Then the fun began!
In my shop, it took about one minute to run my utility knife down the remaining glue in the cracks, and there it was: Front, Back, Broken Edging, Fingerboard, Scroll and Yoke all spead out on the work table. I didn’t need to heat up the old horse-hoof glue to take it apart, it literally fell apart in front of me.
 I checked out what condition things sere. Note the long crack on the lower left-hand side below the construction hole and note the black mold or fungus stains where it must have sat in a lot of moisture because these stains extend through from the outside right into the interior. Well aged, but not treated well obviously. There were similar cracks on the top and deep stains on it as well. So what did you expect for 10 bucks, kid?
I checked out the inside of the Back to see if there was a clue about who made it! Was it an old lost Strad?
Nope Not a STRAD! – But, inside there was a small label: Daniel P. Fry, Boise, Idaho, 1963. He put this together the same year I started studying Zoology at Montana Sate College in Bozeman, Montana.

First things first, remove a whole lot of damaged and scratched up finish so I can work on the body before I put it back together. An orange colored citronella based paint and varnish remover seems better than some of the more aromatic brain damaging removers. You still need to wear gloves because this stuff is caustic.
After getting all the gooey mess of varnish remover off, I sanded, and glued broken and falling apart pieces together again. Here’s the edging being held together as I glue it to the scroll-neck and fingerboard for 24 hours with some clamps.
 Notice that the edging here looks a bit lop-sided. This is because of two things: first it still needs one more gluing to complete the symmetry of the actual violin shape, and secondly, because it is like a spring under tension when all the bowed pieces are finally glued together so that is is under dynamic tension when mounted between the top and bottom of the violin and helps carry vibrations and resonate better with the sound. Note the sides of th eviolin are about 1/16th of an inch think and the thin strips of springy wood that hold them bent in place and strengthen them to attach to the top and bottom are willow.
Once I had glued all the nicely sanded pieces of the edging together, I found that the spruce top was extremely weak with a lot of cracks in it. I was afraid it would collapse under the 2800 lbs. of force exerted on it when I will ultimately put the whole thing together and tighten the strings. To make it less flimsy, I reinforced it by using a couple of coats of old fashioned shellac on the underside to penetrate and stiffen the wood and hold things together. In this view (below), because the shellac had some stain in it, you can see the gouges and cracks along the edges where I have begun sanding to get a new smooth edge to glue to the sides. I also had to completely re-glue the bass-board (that long thin piece running from top to bottom which takes the vibrations of the bass strings and carries them to the two ends of the violin).

Now came the fun of gluing the bottom and then the top of the violin onto the extremely thin walls. I glued the bottom of the violin on first since it had guide holes to hold the springy sides of the walls in their proper places and also because it is made of maple and is much stronger and able to withstand any initial strains caused by the flexing of the edging as everything is glued together. This process needs a lot of clamps and care to get things padded to that the clamps don’t damage the wood of the top or bottom as you tighten everything down.
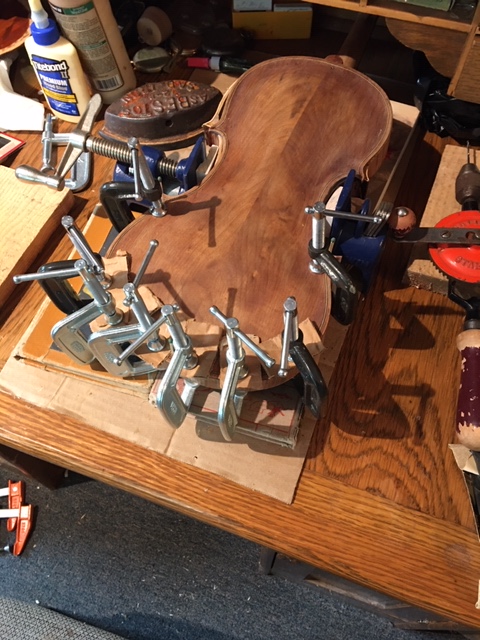
 You can see some of the clamps in place as I work around the body of the violin. Remember, this is not a fast process. Every step takes a good 24 hours to set up and dry as you go along to make things really sturdy and firm with no gaps that will make weird sounds later when you start playing the strings. Note on the upper part of the back, just to the left of center is the black mar caused by water or fungal rot which I had pointed out on the inside. No way I’m going to get this out. It will just become part of the aura and mystery of this violin for the next 50 to 100 years of its life.
Here’s the top of the violin being glued down again with padded clamps to avoid crush marks on the especially soft Spruce wood of the top which is not much more than 1/8th of an inch thick.
 You can see the deep staining of the wood and several deep dark gouge marks that will just have to become a part of the character of the violin as we move forward in getting it back to being a working instrument. The proof will be in the final sound of the stringed instrument when we are all done. If it is good to excellent, then the mars will just become part of its personality.
I am now at the staining and varnishing stage of the work. This is fun because it means that we can give more character to the wood by what we do with it in the final finishing steps of 4 – 5 very thin coats of tinted and clear varnih to leave us with a translucent appearance which will reclect back some of the inner grain and beauty of the wood as modified by the stains. Here are a couple of shots of front and back after the coat #1 of my cherry-wood tinted stain. My initial staining was done with a quick coat of walnut stain to blend in some of the darker imperfections of the wood but to not get too much of the blackness of that stain, so I wiped it off and let dry after about 5 minutes. Then I used a relatively thick cherry-wood stain which I actually rubbed in by hand all over the violin and scroll, leaving lighter wood beneath the fingerboard so that some of the maple marbling will show through the lighter wood where the hand moves back and forth during fingering. My varnish is a synthetic satin finish varnish diluted 50/50 with a very nice red cherry-wood stain to continue colors up through the layers of varnish towards the clear surface.
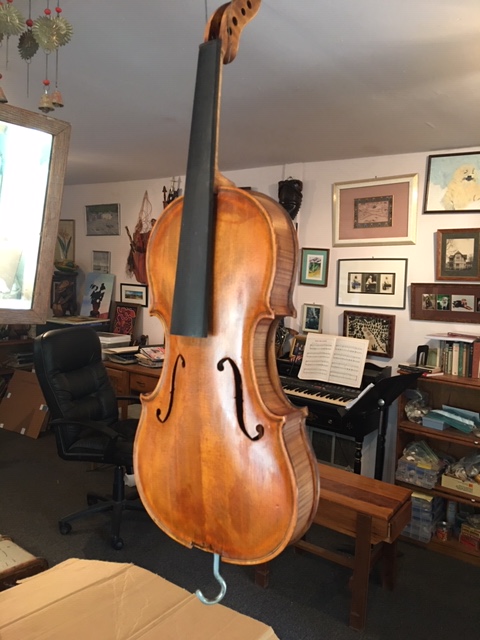

So this is where I am today after about two months of slow patient sanding, gluing, waiting, sanding, staining, waiting, and now varnishing.
I hope you like what is coming out! I will do a final blog on this when I finish up in November and find a proper Luthier who can make and insert a new sound peg to insert on the treble side of the violin. Then I will only have to replace the yoke, make, and fit the bridge, tighten the strings with the pegs and tune it up hopefully by Christmas.
We’ll see if I can still squeak out a good fiddle tune or two for you at that time.
Enjoy!>)
4 Comments on “Repairing an Old Violin – Keeping Sane in the times of COVID-19”
Hope you enjoyed my Blog. I would like to hear from you
South Africa Book Group on Goodreads
.gr_grid_container { /* customize grid container div here. eg: width: 500px; */ } .gr_grid_book_container { /* customize book cover container div here */ float: left; width: 39px; height: 60px; padding: 0px 0px; overflow: hidden; }
 1557 members
This is a book club for all South Africans who love reading! We also have members from other coun...
Books we've read


View this group on Goodreads »
Share book reviews and ratings with South African Book Lovers, and even join a book club on Goodreads.

Hi Rick,
Very interesting. The luthier that made my ukuleles is Aron Keim. His business is “Beansprout Ukukulele”. He formerly worked at Mya Moe. He has several videos on You Tube. So, you could check hi out – I know others as well.
Anyhow quite a project.
Ken
On Mon, Oct 26, 2020 at 3:12 PM Rick McBee’s Writings to Enhance your Life wrote:
> Richard H. McBee Jr. posted: ” Who would have thought that $10.00 spent on > a falling apart old violin could keep me occupied for so much time and give > me so much enjoyment? Wow! Found it in August of this year, sitting all > cracked and scratched with the front and back falling off a” >
LikeLike
Hi Rick:
Did you ever finish the Fry Violin and play it? If so, how did it souund?
Bill in Montana
LikeLike
Bill, Yes, not only did I finish it, I played it and it had a really deep mellow tone. I then took it to Southbeach, Newport, Oregon where my old high school buddy Gene Sonnenberg lives and gave it to him. Gene was in orchestra with me back in the early 60’s at Bozeman Senior High and is a retired UCC minister who taught at Fullerton State, CA. He repairs lots of old violins and then sells them on eBay to fund some of his mission work with congregations in Cambodia, Myanmar and India. He was pleased with the results. I really put my heart into the finishing. It was a gem! Thanks for asking. Rick
LikeLike
Hi Rick. I just discovered the unknown maker of the violin I’ve been using for a year was Daniel Fry. In researching him, I came across your blog and the story you of finding the $10 broken violin and restoring it. It was a happy fluke that I discovered his name inside as all along I had thought it was unsigned.
Tracy in Oregon
LikeLike